「TensorFlow 2.0 Complete Course - Python Neural Networks for Beginners Tutorial」をベースに自分用に説明追加したものになります。
この動画は6時間もあるのでご注意
なお、実行したい人は下記のNoteBookから実行できます(要googleアカウント)
https://colab.research.google.com/drive/1Paw5kceuTaOrH2USp2AuPzWKgbgudh_8
- 分類
- クラスタリング
ついて説明します。
分類(Classification)
回帰を使用して数値を予測した場合、分類は、データポイントを異なるラベルのクラスに分離するために使用されます。この例では、TensorFlow Estimatorを使用して花を分類します。
前に推定器の動作に触れたので、この例をもう少し早く説明します。
このセクションは、TensorFlowウェブサイトの次のガイドに基づいています。 https://www.tensorflow.org/tutorials/estimator/premade
Imports と セットアップ
%tensorflow_version 2.x  # コラボのみです
from __future__ import absolute_import, division, print_function, unicode_literals


import tensorflow as tf

import pandas as pd
データセット
この特定のデータセットは、花を3つの異なるクラスの種に分けます。
- 絹のような
- バーシカラー
- バージニカ
各花に関する情報は以下の通りです。
- がく片の長さ
- がく片の幅
- 花びらの長さ
- 花びらの幅
# 後でつかうの設定する
CSV_COLUMN_NAMES = ['SepalLength', 'SepalWidth', 'PetalLength', 'PetalWidth', 'Species']
SPECIES = ['Setosa', 'Versicolor', 'Virginica']

# ここでは keras (TensorFlow内のモジュール) を使用してデータセットを取得しpandaデータフレームに取り込む
train_path = tf.keras.utils.get_file(
    "iris_training.csv", "https://storage.googleapis.com/download.tensorflow.org/data/iris_training.csv")
test_path = tf.keras.utils.get_file(
    "iris_test.csv", "https://storage.googleapis.com/download.tensorflow.org/data/iris_test.csv")

train = pd.read_csv(train_path, names=CSV_COLUMN_NAMES, header=0)
test = pd.read_csv(test_path, names=CSV_COLUMN_NAMES, header=0)
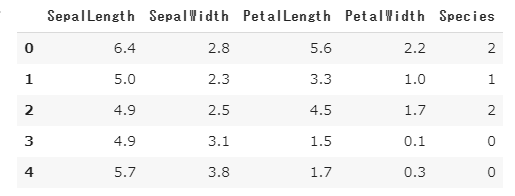
データの内容(上位5件)
train.head()

種の列をポップして、それをラベルとして使用
train_y = train.pop('Species')
test_y = test.pop('Species')
train.head() # the species column is now gone
train.shape
# (120, 4)
入力機能
以前に作成した厄介な入力関数を思い出してください。ここで別のものを作成する必要があります!幸いにも、これは少し消化しやすいです。
def input_fn(features, labels, training=True, batch_size=256):
    # 入力をデータセットに変換します。
    dataset = tf.data.Dataset.from_tensor_slices((dict(features), labels))

    # トレーニングモードの場合は、シャッフルして繰り返します。
    if training:
        dataset = dataset.shuffle(1000).repeat()

    return dataset.batch(batch_size)
機能列
my_feature_columns = []
for key in train.keys():
    my_feature_columns.append(tf.feature_column.numeric_column(key=key))
print(my_feature_columns)
# [ NumericColumn(key='SepalLength', shape=(1,), default_value=None, dtype=tf.float32, normalizer_fn=None)
# , NumericColumn(key='SepalWidth', shape=(1,), default_value=None, dtype=tf.float32, normalizer_fn=None)
# , NumericColumn(key='PetalLength', shape=(1,), default_value=None, dtype=tf.float32, normalizer_fn=None)
# , NumericColumn(key='PetalWidth', shape=(1,), default_value=None, dtype=tf.float32, normalizer_fn=None)]
モデルの構築
これでモデルを選択する準備が整いました。分類タスクには、さまざまな推定器/モデルから選択できます。いくつかのオプションを以下に示します。
- DNNClassifier (ディープニューラルネットワーク)
- LinearClassifier
どちらのモデルも選択できますが、DNNが最良の選択のようです。これは、データ内で線形対応関係を見つけることができない場合があるためです。
それでは、モデルを作成しましょう!
# それぞれ30および10の非表示ノードをもつ2つのレイヤーを持つディープニューラルネットワークを構築します.
classifier = tf.estimator.DNNClassifier(
    feature_columns=my_feature_columns,
    # それぞれ30および10ノードの2つレイヤー.
    hidden_units=[30, 10],
    # モデルは3つのクラスから選択する必要
    n_classes=3)

# INFO:tensorflow:Using default config.
# WARNING:tensorflow:Using temporary folder as model directory: /tmp/tmpge34j5tq
# INFO:tensorflow:Using config:
# {'_model_dir': '/tmp/tmpge34j5tq', '_tf_random_seed': None, '_save_summary_steps'
# : 100, '_save_checkpoints_steps': None, '_save_checkpoints_secs'
# : 600, '_session_config': allow_soft_placement: true

# graph_options {
#   rewrite_options {
#     meta_optimizer_iterations: ONE
#   }
# }
# , '_keep_checkpoint_max': 5, '_keep_checkpoint_every_n_hours': 10000
# , '_log_step_count_steps': 100, '_train_distribute': None
# , '_device_fn': None, '_protocol': None, '_eval_distribute': None
# , '_experimental_distribute': None, '_experimental_max_worker_delay_secs': None
# , '_session_creation_timeout_secs': 7200, '_service': None
# , '_cluster_spec': ClusterSpec({}), '_task_type': 'worker'
# , '_task_id': 0, '_global_id_in_cluster': 0, '_master': ''
# , '_evaluation_master': '', '_is_chief': True, '_num_ps_replicas': 0
# , '_num_worker_replicas': 1}
今行ったのは、2つの隠れ層を持つディープニューラルネットワークを作成することです。 これらの層には、それぞれ30個と10個のニューロンがあります。 これはTensorFlow公式チュートリアルが使用するニューロンの数なので、これに固執します。 ただし、隠れたニューロンの数は任意の数であり、通常、これらの値の最適な選択を 決定するために多くの実験とテストが行われることに言及する価値があります。 非表示のニューロンの数を試してみて、結果が変化するかどうかを確認してください。
トレーニング
classifier.train(
    input_fn=lambda: input_fn(train, train_y, training=True),
    steps=10000)
# If you intended to run this layer in float32, you can safely ignore this warning. If in doubt, this warning is likely only an issue if you are porting a TensorFlow 1.X model to TensorFlow 2.

# To change all layers to have dtype float64 by default, call `tf.keras.backend.set_floatx('float64')`. To change just this layer, pass dtype='float64' to the layer constructor. If you are the author of this layer, you can disable autocasting by passing autocast=False to the base Layer constructor.

# INFO:tensorflow:Done calling model_fn.
# INFO:tensorflow:Create CheckpointSaverHook.
# INFO:tensorflow:Graph was finalized.
# INFO:tensorflow:Restoring parameters from /tmp/tmpge34j5tq/model.ckpt-5000
# WARNING:tensorflow:From /usr/local/lib/python3.6/dist-packages/tensorflow/python/training/saver.py:1077: get_checkpoint_mtimes (from tensorflow.python.training.checkpoint_management) is deprecated and will be removed in a future version.
# Instructions for updating:
# Use standard file utilities to get mtimes.
# INFO:tensorflow:Running local_init_op.
# INFO:tensorflow:Done running local_init_op.
# INFO:tensorflow:Calling checkpoint listeners before saving checkpoint 5000...
# INFO:tensorflow:Saving checkpoints for 5000 into /tmp/tmpge34j5tq/model.ckpt.
# INFO:tensorflow:Calling checkpoint listeners after saving checkpoint 5000...
# INFO:tensorflow:loss = 0.48039886, step = 5000
# INFO:tensorflow:global_step/sec: 492.458
# INFO:tensorflow:loss = 0.47152814, step = 5100 (0.204 sec)
# ・
# ・
# ・
# INFO:tensorflow:global_step/sec: 647.212
# INFO:tensorflow:loss = 0.3012737, step = 14800 (0.158 sec)
# INFO:tensorflow:global_step/sec: 651.296
# INFO:tensorflow:loss = 0.30669963, step = 14900 (0.152 sec)
# INFO:tensorflow:Calling checkpoint listeners before saving checkpoint 15000...
# INFO:tensorflow:Saving checkpoints for 15000 into /tmp/tmpge34j5tq/model.ckpt.
# INFO:tensorflow:Calling checkpoint listeners after saving checkpoint 15000...
# INFO:tensorflow:Loss for final step: 0.3042315.
# <tensorflow_estimator.python.estimator.canned.dnn.DNNClassifierV2 at 0x7f43e12a9390>
※1回動かしているので5000からになっています
ここで説明するのは、steps引数だけです。これは単に5000ステップで実行するように分類子に伝えます。これを変更して、結果が変化するかどうかを確認してください。多いほど良いとは限らないことに注意してください。
評価
eval_result = classifier.evaluate(
    input_fn=lambda: input_fn(test, test_y, training=False))

print('\nTest set accuracy: {accuracy:0.3f}\n'.format(**eval_result))

# To change all layers to have dtype float64 by default, call `tf.keras.backend.set_floatx('float64')`. To change just this layer, pass dtype='float64' to the layer constructor. If you are the author of this layer, you can disable autocasting by passing autocast=False to the base Layer constructor.

# INFO:tensorflow:Done calling model_fn.
# INFO:tensorflow:Starting evaluation at 2020-04-26T12:41:41Z
# INFO:tensorflow:Graph was finalized.
# INFO:tensorflow:Restoring parameters from /tmp/tmpge34j5tq/model.ckpt-15000
# INFO:tensorflow:Running local_init_op.
# INFO:tensorflow:Done running local_init_op.
# INFO:tensorflow:Inference Time : 0.21235s
# INFO:tensorflow:Finished evaluation at 2020-04-26-12:41:41
# INFO:tensorflow:Saving dict for global step 15000: accuracy = 0.93333334, average_loss = 0.36485243, global_step = 15000, loss = 0.36485243
# INFO:tensorflow:Saving 'checkpoint_path' summary for global step 15000: /tmp/tmpge34j5tq/model.ckpt-15000

Test set accuracy: 0.933
今回はステップ数を指定していないことに注意してください。これは、評価中にモデルがテストデータを1回しか見ないためです。
予測
訓練されたモデルができたので、それを使用して予測を行います。
以下に、花の特徴を入力してそのクラスの予測を
確認できる小さなスクリプトを書きました
def input_fn(features, batch_size=256):
    # 入力をラベルなしのデータセットに変換します
    return tf.data.Dataset.from_tensor_slices(dict(features)).batch(batch_size)

features = ['SepalLength', 'SepalWidth', 'PetalLength', 'PetalWidth']
predict = {}
print("Please type numeric values as prompted.")
for feature in features:
  valid = True
  while valid:
    val = input(feature + ": ")
    if not val.isdigit(): valid = False

  predict[feature] = [float(val)]

predictions = classifier.predict(input_fn=lambda: input_fn(predict))
for pred_dict in predictions:
    class_id = pred_dict['class_ids'][0]
    probability = pred_dict['probabilities'][class_id]

    print('Prediction is "{}" ({:.1f}%)'.format(
        SPECIES[class_id], 100 * probability))
# Please type numeric values as prompted.
# SepalLength: 2.4   ←この部分は入力した部分です
# SepalWidth: 2.6  ←この部分は入力した部分です
# PetalLength: 6.5  ←この部分は入力した部分です
# PetalWidth: 6.3  ←この部分は入力した部分です
# INFO:tensorflow:Calling model_fn.
# INFO:tensorflow:Done calling model_fn.
# INFO:tensorflow:Graph was finalized.
# INFO:tensorflow:Restoring parameters from /tmp/tmpge34j5tq/model.ckpt-15000
# INFO:tensorflow:Running local_init_op.
# INFO:tensorflow:Done running local_init_op.
# Prediction is "Virginica" (99.8%)
クラスタリング(Clustering)
クラスタリングは、データポイントのグループ化を伴う機械学習手法です。理論的には、同じグループ内のデータポイントは類似のプロパティや機能を持つ必要がありますが、異なるグループのデータポイントは非常に異なるプロパティや機能を持つ必要があります。
(https://towardsdatascience.com/the-5-clustering-algorithms-data-scientists-need-to-know-a36d136ef68)
残念ながら、TensorFlowの現在のバージョンとKMeansの実装には問題があります。つまり、ゼロからアルゴリズムを作成しないとKMeansを使用できません。まだそのレベルには達していないので、ここではクラスタリングの基本について説明します。
基本アルゴリズム。
- ステップ1:K点をランダムに選択してKの図心を配置する
- ステップ2:すべてのデータポイントを距離で重心に割り当てます。ポイントに最も近い重心は、それが割り当てられているものです。
- ステップ3:各重心に属するすべてのポイントを平均して、それらのクラスターの中央(重心)を見つけます。対応する図心をその位置に配置します。
- ステップ4:すべてのポイントを最も近い重心に再度割り当てます。
- ステップ5:所属する図心が変化しない点まで、ステップ3〜4を繰り返します。