CHATアプリを作るためにMaterial-uiで画面を作ってみました
動きはないですが。全文をみたい人はこちら
Material UI chat - CodeSandbox
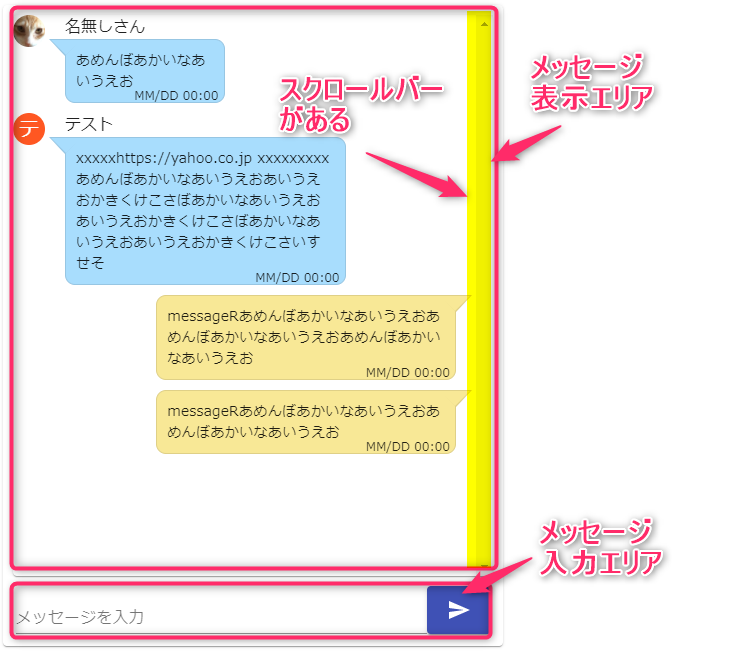
chat画面とは

- LINEのメッセージみたいな画面です。
- 他人が話した内容が左からくる形で、自分は右からくる形です。
- 他人のメッセージの場合は名前とアバターを表示が必要。
- 表示されているしたメッセージをいれる入力ボックスがある。
本当は
https://github.com/Detaysoft/react-chat-elements
というツールを使って作りたかったのですが
Material-uiに対応していないみたいだったので自前で作りました。
時間があるときに「react-chat-elements 」でも作れるのか試してみたいです
画面の要素としては
大きく3つにわかれます
- メッセージを表示する部分
- メッセージを入力する部分
- 上記の2つの範囲を固定枠にしている部分
- メッセージを表示する部分
.messagesBody {
    width: calc( 100% - 20px );
    height: calc( 100% - 80px );
    margin: 10px;
    overflow-y: scroll;
}
高さや幅を計算して設定しています。 高さの部分に関してはoverflow-yを指定する事でスクロールバーを表示しています
- メッセージを入力する部分
.wrapForm {
    width: 95%;
    margin: 0 auto;
    display: flex;
    justify-content: center;
}
あまりよくないかも知れないけど参考にしたサイトがformにcssを指定していた。 display: flexでflex構造にしてjustify-content: centerでセンターに配置した。
flexについては以下の記事を参考にしました
- 2つの範囲を固定にするCSS
.makeStyles-paper-1 {
    width: 80vw;
    height: 80vh;
    display: flex;
    position: relative;
    max-width: 500px;
    max-height: 700px;
    align-items: center;
    flex-direction: column;
}
メッセージを入力する部分
ここからはreactです
import React from 'react'
import TextField from '@material-ui/core/TextField';
import { createStyles, makeStyles, Theme } from "@material-ui/core/styles";
import SendIcon from '@material-ui/icons/Send';
import Button from '@material-ui/core/Button';

const useStyles = makeStyles((theme: Theme) =>
  createStyles({
    wrapForm : {
        display: "flex",
        justifyContent: "center",
        width: "95%",
        margin: `${theme.spacing(0)} auto`
    },
    wrapText  : {
        width: "100%"
    },
    button: {
        //margin: theme.spacing(1),
    },
  })
);

export const TextInput = () => {
    const classes = useStyles();
    return (
        <>
            <form className={classes.wrapForm}  noValidate autoComplete="off">
            <TextField
                id="standard-text"
                label="メッセージを入力"
                className={classes.wrapText}
                //margin="normal"
            />
            <Button variant="contained" color="primary" className={classes.button}>
                <SendIcon />
            </Button>
            </form>
        </>
    )
}
これでテキスト入力の部分ができました。
メッセージを表示する部分
import React from 'react'
import { createStyles, makeStyles, Theme } from "@material-ui/core/styles";
import Avatar from '@material-ui/core/Avatar';
import { deepOrange } from '@material-ui/core/colors';

const useStyles = makeStyles((theme: Theme) =>
    createStyles({
        messageRow: {
            display: "flex",
        },
        messageRowRight: {
            display: "flex",
            justifyContent: "flex-end"
        },
        messageBlue: {
            position: "relative",
            marginLeft: "20px",
            marginBottom: "10px",
            padding: "10px",
            backgroundColor: "#A8DDFD",
            width: "60%",
            //height: "50px",
            textAlign: "left",
            font: "400 .9em 'Open Sans', sans-serif",
            border: "1px solid #97C6E3",
            borderRadius: "10px",
            '&:after': {
                content: "''",
                position: "absolute",
                width: "0",
                height: "0",
                borderTop: "15px solid #A8DDFD",
                borderLeft: "15px solid transparent",
                borderRight: "15px solid transparent",
                top: "0",
                left: "-15px",
            },
            '&:before': {
                content: "''",
                position: "absolute",
                width: "0",
                height: "0",
                borderTop: "17px solid #97C6E3",
                borderLeft: "16px solid transparent",
                borderRight: "16px solid transparent",
                top: "-1px",
                left: "-17px",
            },
        },
        messageOrange: {
            position: "relative",
            marginRight: "20px",
            marginBottom: "10px",
            padding: "10px",
            backgroundColor: "#f8e896",
            width: "60%",
            //height: "50px",
            textAlign: "left",
            font: "400 .9em 'Open Sans', sans-serif",
            border: "1px solid #dfd087",
            borderRadius: "10px",
            '&:after': {
                content: "''",
                position: "absolute",
                width: "0",
                height: "0",
                borderTop: "15px solid #f8e896",
                borderLeft: "15px solid transparent",
                borderRight: "15px solid transparent",
                top: "0",
                right: "-15px",
            },
            '&:before': {
                content: "''",
                position: "absolute",
                width: "0",
                height: "0",
                borderTop: "17px solid #dfd087",
                borderLeft: "16px solid transparent",
                borderRight: "16px solid transparent",
                top: "-1px",
                right: "-17px",
            },
        },

        messageContent: {
            padding: 0,
            margin: 0,
        },
        messageTimeStampRight: {
            position: "absolute",
            fontSize: ".85em",
            fontWeight: "300",
            marginTop: "10px",
            bottom: "-3px",
            right: "5px",
        },

        orange: {
            color: theme.palette.getContrastText(deepOrange[500]),
            backgroundColor: deepOrange[500],
            width: theme.spacing(4),
            height: theme.spacing(4),
        },
        avatarNothing: {
            color: "transparent",
            backgroundColor: "transparent",
            width: theme.spacing(4),
            height: theme.spacing(4),
        },
        displayName: {
            marginLeft: "20px",
        },
    })
);

//avatarが左にあるメッセージ(他人)
export const MessageLeft = (props) => {
    const message = props.message ? props.message : 'no message' ;
    const timestamp = props.timestamp ? props.timestamp : '' ;
    const photoURL = props.photoURL ? props.photoURL : 'dummy.js' ;
    const displayName = props.displayName ? props.displayName : '名無しさん' ;
    const classes = useStyles();
    return (
        <div className={classes.messageRow}>

            <Avatar alt={displayName} className={classes.orange}  src={photoURL} ></Avatar>
            <div>
            <div className={classes.displayName}>{displayName}</div>
            <div className={classes.messageBlue}>
                <div><p className={classes.messageContent}>{ message}</p></div>
                <div className={classes.messageTimeStampRight}>{timestamp}</div>
            </div>
            </div>
        </div>
    )
}
//自分のメッセージ
export const MessageRight = (props) => {
    const classes = useStyles();
    const message = props.message ? props.message : 'no message' ;
    const timestamp = props.timestamp ? props.timestamp : '' ;
    return (
        <div className={classes.messageRowRight}>
            <div className={classes.messageOrange}>
                <p className={classes.messageContent}>{ message}</p>
                <div className={classes.messageTimeStampRight}>{timestamp}</div>
            </div>
        </div>
    )
}
- 他人と自分で関数を別にしています
material-uiのcreateStylesでafterの指定
- afterの指定をする場合は対象の中にいれる必要がありました
.message-orange {
    position: relative;
    margin-bottom: 10px;
    margin-left: calc(100% - 240px);
    padding: 10px;
    background-color: #f8e896;
    width: 200px;
    height: 50px;
    text-align: left;
    font: 400 .9em 'Open Sans', sans-serif;
    border: 1px solid #dfd087;
    border-radius: 10px;
}
.message-blue:after {
    content: '';
    position: absolute;
    width: 0;
    height: 0;
    border-top: 15px solid #A8DDFD;
    border-left: 15px solid transparent;
    border-right: 15px solid transparent;
    top: 0;
    left: -15px;
}
このCSSをcreateStylesで記載した場合は以下になります(微妙に違うけど)
messageOrange: {
    position: "relative",
    marginRight: "20px",
    marginBottom: "10px",
    padding: "10px",
    backgroundColor: "#f8e896",
    width: "60%",
    //height: "50px",
    textAlign: "left",
    font: "400 .9em 'Open Sans', sans-serif",
    border: "1px solid #dfd087",
    borderRadius: "10px",
    '&:after': {
        content: "''",
        position: "absolute",
        width: "0",
        height: "0",
        borderTop: "15px solid #f8e896",
        borderLeft: "15px solid transparent",
        borderRight: "15px solid transparent",
        top: "0",
        right: "-15px",
    },
},
こちらの記事を参考にしました
material-uiのcreateStylesで空白を指定する場合
セリフの矢印をつくるためにはcontentを空白にする必要がありました。 単純に空をしてするのではなく空をくくる必要がありました
.message-blue:after {
    content: '';
}
このCSSをcreateStylesで記載した場合は以下になります(微妙に違うけど)
messageOrange: {
    '&:after': {
        content: "''",
    },
},
この記載方法でいいのかよくわからず・・・ (どこにも載っていなくて困った)
material-uiのAvatarで画像がない場合に文字を出力する場合
material-uiのAvatarで画像がない場合に1文字のアバターを作る事ができます

この判別はAvatarのsrcが存在するかしないかになります。
srcが空白の場合
Avatarの部分にアイコンを表示しています

<div className={classes.messageRow}>
  <Avatar alt="Masalib" src="" className={classes.orange} />
  <div className={classes.messageBlue}>
    <p className={classes.messageContent}>This is an awesome message!</p>
    <div className={classes.messageTimeStampRight}>SMS 13:37</div>
  </div>
</div>
srcが相対パスの存在しないファイルの場合
1文字のアバターになります

<div className={classes.messageRow}>
  <Avatar alt="Masalib" src="/dummy.jp" className={classes.orange} />
  <div className={classes.messageBlue}>
    <p className={classes.messageContent}>This is an awesome message!</p>
    <div className={classes.messageTimeStampRight}>SMS 13:37</div>
  </div>
</div>
srcが絶対パスの存在しないファイルの場合
1文字のアバターになります
<div className={classes.messageRow}>
  <Avatar alt="Masalib" src="https://lh3.googleusercontent.com/" className={classes.orange} />
  <div className={classes.messageBlue}>
    <p className={classes.messageContent}>This is an awesome message!</p>
    <div className={classes.messageTimeStampRight}>SMS 13:37</div>
  </div>
</div>
メッセージを表示と入力を結合
作ったコンポーネントをよんでいるだけです。
import React from 'react'
import { createStyles, makeStyles, Theme } from "@material-ui/core/styles";
import { Paper, } from '@material-ui/core';
import {TextInput} from './TextInput.js';
import {MessageLeft,MessageRight} from './Message';

const useStyles = makeStyles((theme: Theme) =>
  createStyles({
        paper: {
            width: '80vw',
            height: '80vh',
            maxWidth: '500px',
            maxHeight: '700px',
            display: 'flex',
            alignItems: 'center',
            flexDirection: 'column',
            position: 'relative'
        },
        paper2: {
            width: '80vw',
            maxWidth: '500px',
            display: 'flex',
            alignItems: 'center',
            flexDirection: 'column',
            position: 'relative'
        },
        container: {
            width: '100vw',
            height: '100vh',
            display: 'flex',
            alignItems: 'center',
            justifyContent: 'center'
        },
        messagesBody: {
            width: 'calc( 100% - 20px )',
            margin: 10,
            overflowY: 'scroll',
            height: 'calc( 100% - 80px )'
        },
    })
);

export default function App() {
  const classes = useStyles();
  return (
    <div className={classes.container}>
    <Paper className={classes.paper} zDepth={2} >
        <Paper id="style-1" className={classes.messagesBody}>
            <MessageLeft message="あめんぼあかいなあいうえお" timestamp="MM/DD 00:00" photoURL="https://lh3.googleusercontent.com/a-/AOh14Gi4vkKYlfrbJ0QLJTg_DLjcYyyK7fYoWRpz2r4s=s96-c" displayName="" avatarDisp={true}/>
            <MessageLeft message="xxxxxhttps://yahoo.co.jp xxxxxxxxxあめんぼあかいなあいうえおあいうえおかきくけこさぼあかいなあいうえおあいうえおかきくけこさぼあかいなあいうえおあいうえおかきくけこさいすせそ" timestamp="MM/DD 00:00" photoURL="" displayName="テスト" avatarDisp={false}/>
            <MessageRight message="messageRあめんぼあかいなあいうえおあめんぼあかいなあいうえおあめんぼあかいなあいうえお" timestamp="MM/DD 00:00" photoURL="https://lh3.googleusercontent.com/a-/AOh14Gi4vkKYlfrbJ0QLJTg_DLjcYyyK7fYoWRpz2r4s=s96-c" displayName="まさりぶ" avatarDisp={true}/>
            <MessageRight message="messageRあめんぼあかいなあいうえおあめんぼあかいなあいうえお" timestamp="MM/DD 00:00" photoURL="https://lh3.googleusercontent.com/a-/AOh14Gi4vkKYlfrbJ0QLJTg_DLjcYyyK7fYoWRpz2r4s=s96-c" displayName="まさりぶ" avatarDisp={false} />
        </Paper>
        <TextInput />
    </Paper>
</div>
  );
}
感想
CSSはあまり勉強してこなかったので大した事ない画面でも時間がかかる。 勉強して短縮できるようにしたいです
CSSからmaterial-uiのcreateStylesの形式に変えるのが地味にめんどくさい